There is a reason WordPress is the world’s most popular CMS platform.
At first glance, you may feel a bit overwhelmed at all that WordPress has to offer.
I know I was when I first started.
But with a little self-education and patience, you can quickly become a pro at working with and installing WordPress.
The steps below will help you install WordPress quickly and easily.
Prior to Installation
Quick-Install Method
Make sure you have access to your cPanel. This is typically where the Quick-Install options for WordPress can be found.
Manual Install Method
Make sure you can access your web server via FTP as you’ll be uploading the WordPress files and directories to your website. This means you’ll need an FTP Client.
Recommended FTP Clients
Steps to Quick-Install WordPress
1. Log into your cPanel
This login information is usually sent to you via email when you first create your hosting account.
It should contain the login username, password, and URL to the cPanel of your hosting account.
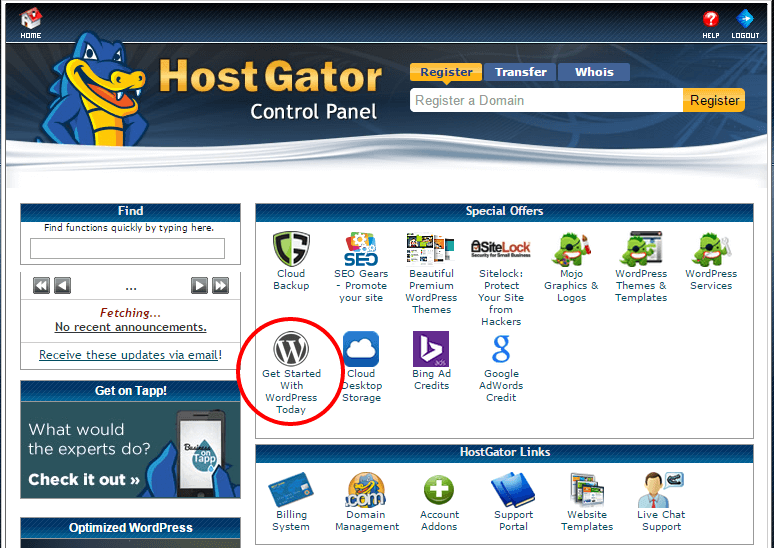
2. Find the Quick-Install option
The Quick-Install WordPress options are usually found at the top of the cPanel.
The picture below illustrates what your cPanel looks like and where to find the Quick-Install option for WordPress on a HostGator account, for example.
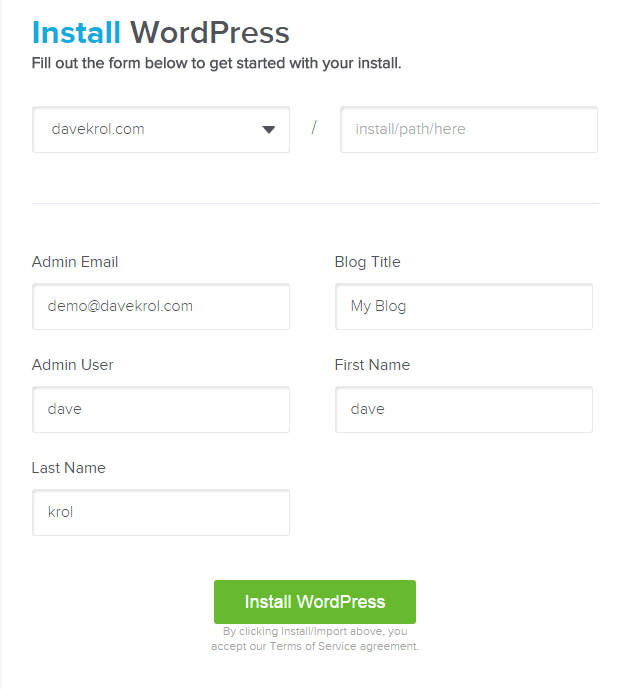
3. Fill in the Necessary Information for your WordPress Site
Next, you will be prompted with a form to fill out in order to get the installation process underway. If you look at the picture below you’ll get an idea of the information you need to fill out.
Thankfully, there isn’t all that much you need to include and most of the information can be changed later.
For example, don’t worry about naming your blog for now. You can always change that later in the WordPress dashboard.
Just go with something like Blog for the time being.
The only important thing is to make sure you are installing WordPress on the right domain or subdomain. So just make sure you pick the right option in the dropdown menu.
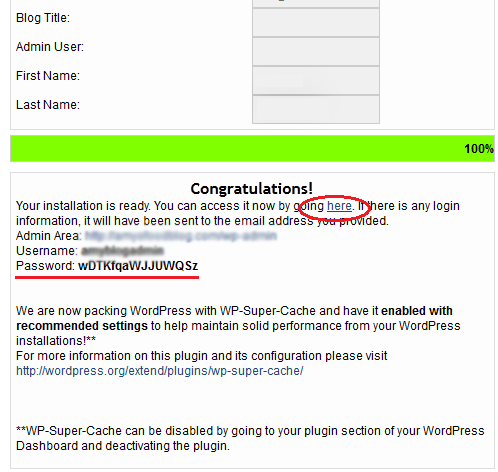
4. Installation Complete – Log Into Your WordPress Site
After you submit the information in the step above you’ll be presented with a temporary password, username, and URL to your WordPress login.
It will look similar to the picture below.
Typically, WordPress site login pages have /wp-admin appended to the end of the root URL. So your login URL will look something like:
http://yourdomain.com/wp-admin
Use this information to log into your newly installed WordPress site and make sure the installation was a success.
While you are there, take this opportunity to reset your password to something that is secure, but easy for you to remember.
You can change the password by going to the Users menu option in the left sidebar of the WordPress Dashboard.
5. Setup WordPress & Security Precautions
Even though you have just successfully installed WordPress there is still more to do. Or at least, more you should do.
Definitely look at our list of WordPress Do’s and Don’ts and WordPress Security Checklist to get started on the right foot.
Steps to Manually Install WordPress to Your Own Website
1. Download WordPress from the WordPress.org website.
It is best to use the latest version, because of security patches.
Save the files to a location you’ll be able to locate easily, such as your desktop or a special folder.
Next, you will unzip the downloaded WordPress files.
2. Log Into cPanel and Create a MySQL Database
Log into the cPanel on your Website and Create a MySQL Database. Then create a MySQL username and password.
If your web hosting company uses cPanel, which is one of the most common server panels, navigate to MySQL Database Wizard to create the database.
If your server utilizes different software for control panel access, contact them for details on how to navigate to your MySQL wizard.
3. Login via FTP and Upload WordPress Files
Next, log in to your site via the FTP Client of your choice, such as Filezilla or Cute FTP. Upload the unzipped WordPress folder.
You can either upload the files to the root folder (main folder) of your site.
When visitors come to your website at yourdomain.com, they will see your blog first thing. If you prefer to have your blog on a page other than your main page, you can also install WP in a subfolder of your choosing.
Once the files have finished uploading, open your web browser of choice and type in your domain name. If you placed your files in a subdirectory, you’ll want to visit that directory.
The WordPress software should automatically pull up a tutorial that will walk you through the final steps to install the software via an installation script.
4. Access your Dashboard to Make Initial Changes
Now, access your dashboard by going to your website address and then tagging on /wp-admin to the end of the address. So, an example would be www.yoursite.com/wp-admin.
Log in with the username and password you set up via the MySQL feature in your control panel.
You can now choose a theme, add posts and utilize plugins to add special features to your page.
5. Setup Security Precautions
One of the first things you should do is to go to plugins and seek out a firewall. WordPress is extremely vulnerable to hacking attempts. A firewall will protect your site from hacking attempts.
You can also set it to notify you of these attempts so that you and your server can work to block them in the future by blocking the IPs of those trying to hack in.
Conclusion
Installing WordPress isn’t difficult.
However, many web hosting companies also offer features via their control panels that allow you to install with a single click.
If your control panel features Fantastico, for example, look there to see if a simpler WP installation process is available.
With just a little work, you’ll quickly join other bloggers from around the world and begin entertaining site visitors.