
I recently had to add UTM parameters to Wufoo Form Submissions for a client. They had a custom developed HTML site and were using a custom form that sent the submitted values to a Wufoo form (not the ideal implementation). After properly setting up their Wufoo form, I realized that several others were using Wufoo but not passing any UTM parameters along. This creates a gap in attribution for lead generation / PPC marketing, and that’s just not acceptable. After all, if you’re doing all that hard work to understand what’s generating leads, then you should definitely add UTM parameters to Wufoo form submissions.
UTM Codes – What are they?
If you’re a beginner, then the very first question that would come to mind is: What exactly are UTM parameters and how are they useful? Below is a quick overview.
UTM stands for Urchin Tracking Module. UTM codes are a fantastic way for a marketing professional to track their results and adjust spend. After all, results are what matters to the client. A UTM code is just a string of text that can be attached with a custom URL to track a source, medium, campaign, adgroup and other similar aspects that might be useful for both, the marketer and their clients. Common uses of UTM codes include creating a vanity URL for your campaign, and redirecting that URL to the targeted page. This gives you the benefit of being able to monitor, track and keep records of how a user reached your page, via which campaign, which particular ad / commercial attracted the user, rather than having to create separate landing pages for each campaign or adgroup. This also gives you the advantage of being able to track distinct sources, medium AND campaign names! along with any other keywords that might seem valuable to track.
Once you know the keywords, terms, and values that need to be tracked, Google provides a wonderful tool, that allows you to build your custom URL, share it and also convert it to a shortened URL – Campaign URL Builder. Here is an example of how a custom URL would look:
https://www.my99rcampaigntracking.com/?utm_source=google&utm_medium=cpc&utm_campaign=99R_2018_television_ads&utm_adgroup=tv_ads
Analyzing the URL, we see that the source (utm_source) is google, medium (utm_medium) is cpc, campaign-name (utm_campaign) is 99R_2018_television_ads and say a keyword – adgroup (utm_adgroup) is tv_ads. As you can see, each UTM parameter is helpful for attribution purposes. These are especially useful to marketers because it tells them exactly which ad group generates the click or lead, which ad group generated the most users, and use this information to make better decisions on advertising spend.
Another amazing thing about UTM parameters is that they can be passed through fields of a form on your page. These fields can be hidden so that a visitor does not see them. Furthermore, these fields could be pre-populated using a simple and custom Javascript or jQuery code snippet that fetches the values from the custom URL we created above. Let’s continue with that example.
What is Wufoo? – Wufoo helps you create contact forms, online surveys, and invitations so you can collect the data, registrations and payments you need. Their form designer helps you customize a form for your website so that it blends in with your website layout. Now that we know what Wufoo is, let’s go ahead and learn how to pass UTM parameters to the form submissions.
Set Up Parameter Passing to Wufoo
- Login to your Wufoo account – https://secure.wufoo.com/login/
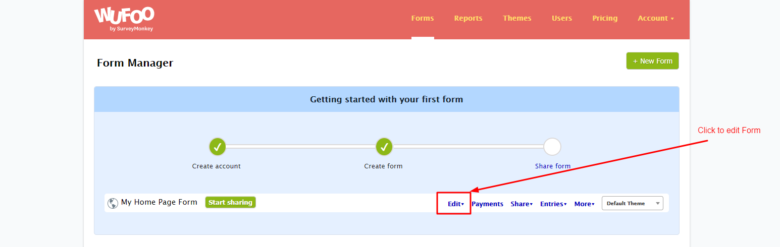
- Click on Create Form to start creating a new form or click on Edit and select any existing form.


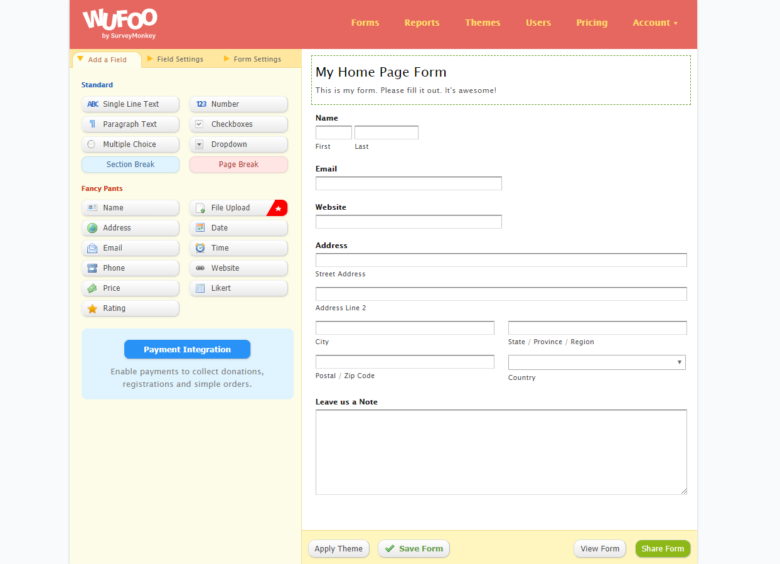
- Below is what your form will look like, though it can have more or fewer fields. The actual fields do not matter for this tutorial.

- Click on Add a Field in the top left corner, and select the Single Line Text field. You can add as many single line text fields as necessary to correspond to the values / utm parameters you want to pass. I am going to add 4 fields to correspond to the four UTM parameters discussed above, namely – source, medium, campaign and adgroup. You should name them clearly. For example, utm_source for source, utm_medium for medium and so on.

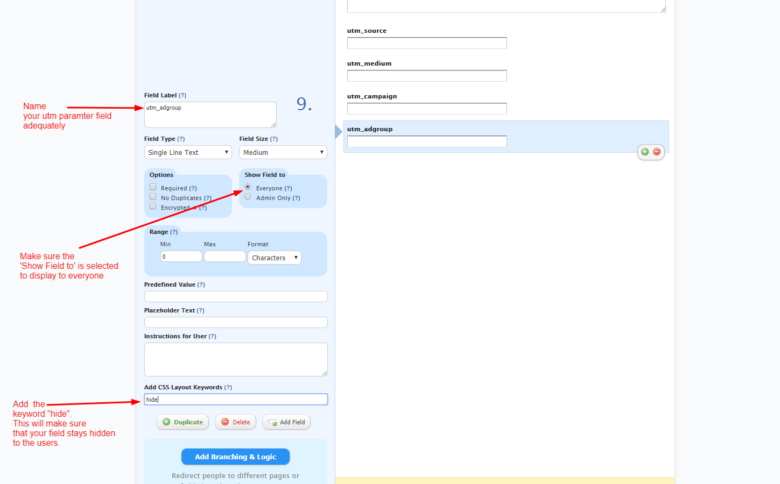
- Now we will look into the settings of the form fields. Click on the second tab on the top left corner and navigate to the desired field – the utm parameter fields in this case.
- Make sure the “Show Field to” radio button is selected to show Everyone.
- In the bottom-most field setting – “Add CSS Layout Keywords“, type in “hide“. This will make sure your field will stay hidden on the front end.
- Make sure that under “Options“, the “Required” checkbox is not selected.
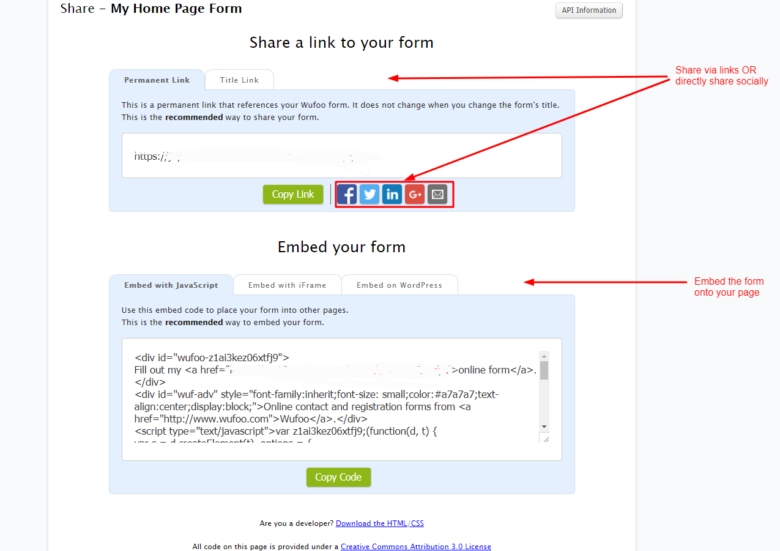
- Your form is now ready! You can now either Share your form via the share-link provided or embed the form on your page with the help of the Wufoo Javascript Embed code, the Wufoo iframe Embed code, or if your site is a WordPress site, you can embed it via a shortcode. Click on the Share Form at the bottom of the page to see the available options. To get detailed instructions on how to embed the form, you can refer to the Wufoo support doc.

- Now, we move forward to the tracking code on the landing page.
- Prerequisites:
- The landing page already has the Google Analytics code snippet in the <head></head> section of the page.
- The jQuery library has been installed or a jQuery cdn has been called. If not, you can go to https://code.jquery.com/ and select the latest release, copy the cdn script code and add it to the header section (<head>) of your landing page.
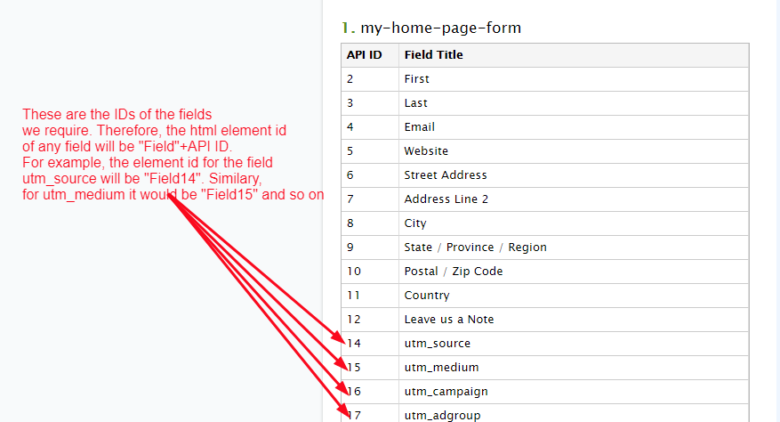
- Go to Forms in your account. On the subnav, click on the dropdown “More“, and click on “API information“. Here you will be able to see your form hash, API key and all the fields, along with their ids. Now the html element id for a form field will be “Field”+”API ID”. Therefore, the if a field has the API ID as 7, its html element ID will be Field7. Note down all the field IDs and html element IDs for the utm parameter fields. They will be used to pre-populate the fields using our code in the following steps.

- Now that we have our html element ids for the form fields (namely Field14, Field15, Field16 and Field17), Add the following script to your page header AFTER the Google Analytics Code snippet and jQuery cdn script. (IMPORTANT: Replace the element ids in the script below with your own element ids)
<script>

// Parse the URL to get the required field values

function getUtmParamByName(utmname) {

    utmname = utmname.replace(/[\[]/, "\\[").replace(/[\]]/, "\\]");

    var regex = new RegExp("[\\?&]" + name + "=([^&#]*)"),

        results = regex.exec(location.search);

    return results === null ? "" : decodeURIComponent(results[1].replace(/\+/g, " "));

}
// Give the URL parameters variable names
var source = getUtmParamByName('utm_source');
var medium = getUtmParamByName('utm_medium');
var campaign = getUtmParamByName('utm_campaign');
var adgroup = getUtmParamByName('utm_adgroup');
// Put the variable names into the hidden fields in the form.
$( document ).ready(function() {
 $('#Field14').val(source);
 $('#Field15').val(medium);
 $('#Field16').val(campaign);
 $('#Field17').val(adgroup);
}
</script>
- Prerequisites:
- That’s it! Navigate to your landing page via your custom URL (with UTM parameters), fill out the form to create a test entry and click on submit. Now go to your Wufoo account > Forms > Entries. Check your most recent entry and you should see your latest entry along with your utm parameter fields in there!

References:
- How to use utm parameters – http://jennamolby.com/how-to-use-utm-parameters-to-capture-lead-source/
- Parameter passing – https://www.wufoo.com/guides/parameter-passing-to-wufoo/
- Form sharing and embedding – https://help.wufoo.com/articles/en_US/kb/Embed
Next time you have to add UTM Parameters to Wufoo form submissions, just refer to this page. If you liked this tutorial or have any questions, give me a shout in the comments below!


2 Responses
Hi, Jay, I’ve followed your tutorial with exactness. It’s a well-written tutorial and couldn’t get it to work. I think you’re missing ‘defaultValues’: getDefaultValuesString(), on the Wufoo script. I found that out with the help of this other tutorial: https://medium.com/@mabumusa/pre-fill-wufoo-forms-with-utm-tags-153b6d545c5e
Is this still the case Joel?